很久沒有放些設計相關的東西了,下午逛了一下
Car Body Design,裡面有不少汽車資訊。也放了不少教學資料.....
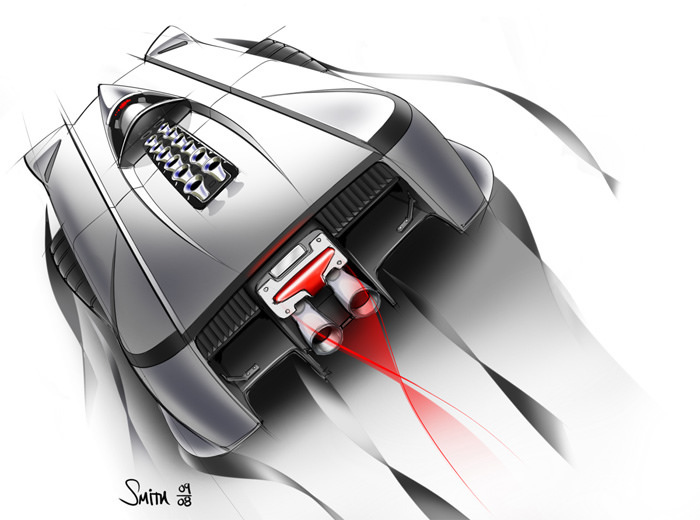
上面這張就是Michael Smith用SketchBook畫的,而且還說明了上色的方式,Step by step的方式應該讓新手覺得親切
不少吧!
教學連結:
AliasDesignhiccer(發音hikr) 發表在 痞客邦 留言(3) 人氣(3,858)

拿了以前某次部門會議時.在底下亂畫的草圖.今天回家給它上色一下!
好久沒有練練sketch了~拿相機的時間都比拿筆多^^
還是習慣真正的筆在紙張的感覺.用數位版總是拿不住比例和手感!
真羡慕網路上一些高手把數位版用的跟紙一樣!
對我來說.己經沒那麼執著了.只要可以畫.用什麼都是一樣的.都只是用來溝通的工具罷了!
hiccer(發音hikr) 發表在 痞客邦 留言(17) 人氣(669)
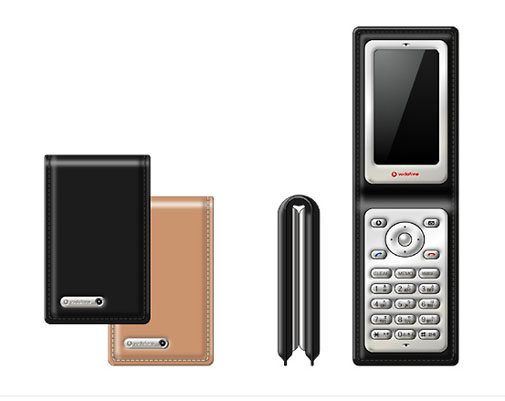
有時候適當的加註及文字說明!!
可以讓人更容易傳達設計意圖
Vodafone design的產品草圖表達相當簡洁!!
加入手部.文字.跟操作方向示意
hiccer(發音hikr) 發表在 痞客邦 留言(0) 人氣(2,509)

這是Hussein的sketch上色步驟說明
他的Rendering比較炫麗
背景和主體的搭配也很協調.
此教學可以了解"hussein如何快速模擬背景
和gnomonworkshop的教程相似
都是以鉛筆精描後.再掃進PS裡上色
很明確的效果圖.
hiccer(發音hikr) 發表在 痞客邦 留言(2) 人氣(1,222)
video tutorial link
http://www.serjjart.com/Serjj_Car_tutorial.wmv239 mb 2 hour這是 Product forums裡熱心的網友所作的vedio教學
設計者sergey 是用單色的方法上色.
有別於Harald Belke的上色方法
雖然沒有炫麗的顏色效果
但卻更符合設計習慣(減少大量路徑描點的方式)
很實用的上色技巧.
泡杯咖啡.放片cd..(因為影片沒有聲音><")
慢慢欣賞sergey的rendering...
hiccer(發音hikr) 發表在 痞客邦 留言(0) 人氣(2,061)
原始網址:http://www.sclipo.com/video/visual-thinking
作者nedzadm.是使用alias studiotools配合wacom
hiccer(發音hikr) 發表在 痞客邦 留言(0) 人氣(615)
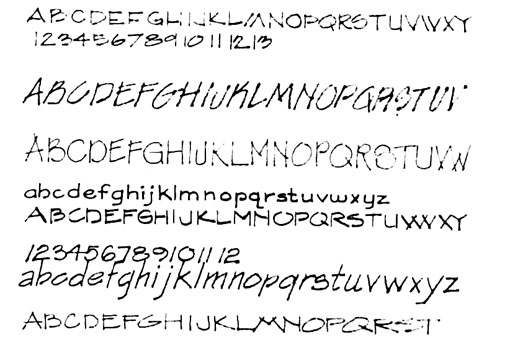
文字也是用來表達設計理念的方式之一.初學者可先參考別人的手寫字體。
等熟悉手寫體後.再漸漸的發展出自己的字體風格。
在草圖上.可以先用直尺畫上直線.讓書寫的文字一致性.等到練習到相當
hiccer(發音hikr) 發表在 痞客邦 留言(0) 人氣(1,899)
麥克筆加粉彩,很清楚的上色步驟!
說明是英文的~順便提升自己的英文能力吧!!
---------------------------------------------------------------------------------------------
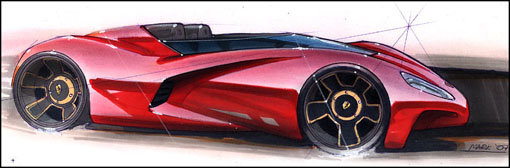
In this tutorial, Mark will show us a sketch rendering using traditional markers and pastels. In many of today’s studios, the computer and software such as Photoshop have replaced these techniques. They have undoubtedly moved things on leaps and bounds and there are many talented designers out there pushing new digital techniques further every day, but sometimes its good to take a step back and have a more “hands on approach” to a sketch.
hiccer(發音hikr) 發表在 痞客邦 留言(0) 人氣(12,755)
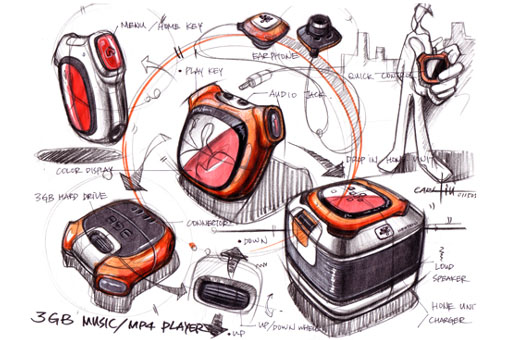
Carl liu 是台灣人喔.中文名子是劉傳凱!而且是motorola的設計中心經理
轉貼Carl的麥克筆手繪步驟.希望對大家有所幫助!!
第一步 apply light pencil stroke to give basic design and position on the page. (用鉛筆 輕輕的在紙上畫出大概的圖案和位置) 第二步 refining the shape of the object. (修飾物體的圖形) 第三步 apply heavier pencil stroke when design is confirmed. Then repeat the step 1 for other views. (當設計確定時 加上粗的鉛筆線條 然後重複同樣的步驟 在其它角度的草圖上)第四步 lay in more design content.. (加多一點東西...) 第五步 a little guy for showing how to use the object. (畫一個人 解釋如何去使用這個產品) 第六步 give shadows to make the drawn object jump out the page. (加上陰影 讓圖更跳)
第七步 apply heavy line weight to trace the light sketch. (再加上重線條在之前的草圖上)第八步 more details.. (加細節...)
第九步 more details.. (加細節...)
第十步
marker color in on the back of the tracing paper.
(把麥克筆上在描圖紙的背面)
第十一步
Keep fill in color form the back of the tracing paper. (繼續在描圖紙的背面上 塗上其它的顏色)
第十二步 Black and white prismacolor pencils give dark cores and high light on objects. (用黑色和白色的色鉛筆 在物體上畫出光影和陰影) 第十三步 add call-out to explain the design intension.. Sign and then finish. (加上註解 解釋設計的意圖 簽名 然後就完成)
追加(after scenes):
如何上麥克筆在描圖紙上
P1_ marker color in on the back of the tracing paper. (在描圖紙的背面上麥克筆) P2_ keep using makers on the back. (繼續上麥克筆在描圖紙的背面)P3_ put a mesh underneath the page for speaker texture. (把網眼墊在描圖紙的背後 用來畫出喇叭布的質感) P4_ hold pencil side ways to apply dark cores. (斜斜的抓筆 來畫出陰影)
P5_ add shadows on objects. (加上影子在物體上)
P6_ white pencil to give high light and part lines. (用白色的色鉛筆 加上光影和分模線)
P7_ Material and tools. always remember to keep the pencil sharp. (材料和工具 永遠記得削尖鉛筆)hiccer(發音hikr) 發表在 痞客邦 留言(8) 人氣(16,032)
轉貼於Billwang. Zoomking的教學.
請點下圖連結到相簿
hiccer(發音hikr) 發表在 痞客邦 留言(0) 人氣(1,174)